It’s been awhile since I’ve had a non-work related assignment to complete, and generally I’m quite grateful for that. Earlier this month, though, I was reading through one of my favorite blogs (Pink of Perfection) and the author, Sarah, had posted an enticing open project for completion.
Sunday, April 27, 2008
Courting Myself at Sweet Melissa
Saturday, April 19, 2008
The sweetness of whole(some) foods
Today I took a ride on the little-frequented (by me) Q train, which has a stop relatively close to my apartment. The distance is short enough that I have no problem walking to and from the station, but far enough that I wouldn’t want the Q to be my every day commuter train (that honor goes to the lovely F train). So when I took the leisurely stroll from the Q station, I noticed something very striking on
Of course, I was — and still am — torn between the “there goes the neighborhood” attitude, knowing that my environs are becoming much more gentrified and soon I may not even be able to afford the rent around here, and the absolute thrill of knowing that I can walk to a big, beautiful co-op full of wholesome and natural foodstuff, and I don’t even need to join in order to shop there!
As one would expect, at the moment the latter impulse won over, and I dashed across the street and through the automatic doors of the bright, conscious-consumer friendly haven of all things organic. I made mental notes of produce prices and I eyed the juice bar menu; I found my favorite teas lined up directly at my eye level and basked in the aisle of Newman’s Own cookies. When I found the baking goods, I was struck by the sheer variety of what I could buy all-naturally…there was the run-of-the mill whole-wheat flour, sure, but there were also bags of spelts and brans and unrefined sugars, many with variations that I had never even known existed. It was amongst these shelves that I spied a bag of wheat bran. Picking it up and routinely checking out the nutrition information, I was reminded of a recipe that I had found and put aside, in my “remember for future use” file: Wheat Bran Blueberry Muffins.
While I simply do not have the need to have a full batch of muffins at my disposal, this recipe is absurdly healthful, and quite tasty looking as well. And if I can make a full batch of red velvet cupcakes, then I really should have no qualms with making the muffins, a much more wholesome choice.
I paid for my wheat bran, helped myself to a membership brochure (no, there is no room in my budget for a food co-op membership, but for a fleeting few moments, I had liked to think there could be), and soon after, I was in my kitchen, baking muffins.
Yield: About 2 dozen regular-sized muffins
1 1/2 cups wheat bran
1 cup nonfat milk
1/2 cup unsweetened applesauce
1 egg
2/3 cup brown sugar
1/2 teaspoon vanilla extract
1/2 cup all-purpose flour
1/2 cup whole wheat flour
1 teaspoon baking soda
1 teaspoon baking powder
1/2 teaspoon salt
1 cup blueberries
1. Preheat oven to 375 degrees F. Grease muffin cups or use paper muffin liners. Mix together wheat bran and milk, and let stand for 10 minutes.
2. In a large bowl, mix together applesauce, egg, brown sugar, and vanilla. Beat in bran mixture. Sift together all-purpose flour, whole wheat flour, baking soda, baking powder, and salt. Stir into bran mixture until just blended. Fold in blueberries. Scoop into muffin cups.
3. Bake in preheated oven for 16 to 20 minutes, or until tops spring back when lightly tapped.
Sunday, April 6, 2008
Brooklyn Flea and Red Velvet
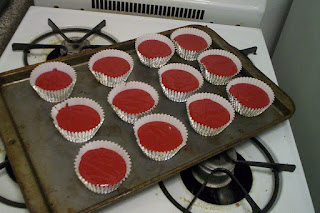
Brooklyn Flea and red velvet cupcakes: these are my two favorite things of the weekend.
The recipe below is from Magnolia’s More From Magnolia cookbook, and can also be found on a wonderful blog that I frequent, Nosh With Me at www.noshwithme.com
Red Velvet Cupcakes
Yield: About three dozen regular-sized cupcakes
Ingredients:
3 ⅓ cups cake flour (not self-rising)
¾ cup (1 ½ sticks) unsalted butter, softened
2 ¼ cups sugar
3 large eggs, at room temperature
6 tablespoons red food coloring
3 tablespoons unsweetened cocoa
1 ½ teaspoons vanilla extract
1 ½ teaspoons salt
1 ½ cups buttermilk
1 ½ teaspoons cider vinegar
1 ½ teaspoons baking soda
Directions:
Preheat oven to 350 degrees. Line a cupcake pan with paper liners, or grease and lightly flour.
To make the cake: In a small bowl, sift the cake flour and set aside. In a large bowl, on the medium speed of an electric mixer, cream the butter and sugar until very light and fluffy, about 5 minutes. Add the eggs, one at a time, beating well after each addition.
In a small bowl, whisk together the red food coloring, cocoa, and vanilla. Add to the batter and beat well.
In a measuring cup, stir the salt into the buttermilk. Add to the batter in three parts, alternating with the flour. With each addition, beat until the ingredients are incorporated, but do not overheat.
In a small bowl, stir together the cider vinegar and baking soda. Add to the batter and mix well. Using a rubber spatula, scrape down the batter in the bowl, making sure the ingredients are well blended and the batter is smooth.
Divide the batter among the prepared pans. Bake for 20 minutes, or until a toothpick inserted in the center of the cake comes out clean. Let the cupcakes cool in the pans for 1 hour. Remove from the pans and cool completely on a wire rack.
When the cake has cooled, ice with cream cheese frosting.
Frosting
1 pound (two 8-ounce packages) cream cheese, softened and cut into small pieces
6 tablespoons unsalted butter, softened and cut into small pieces
1 ½ teaspoons vanilla extract
5 cups sifted confectioners’ sugar
In a large bowl, on the medium speed of an electric mixer, beat the cream cheese and butter until smooth, about 3 minutes. Add the vanilla and beat well. Gradually add the sugar, 1 cup at a time, beating continuously until smooth and creamy. Cover and refrigerate icing for 2 to 3 hours, but no longer, to thicken before using.
Tuesday, April 1, 2008
Oatmeal Chocolate Chip Deliciousness
To me, the term “comfort food” indeed invokes visions of rich chocolate cake, cheesy pizza, and thick slices of homemade bread slathered with jam. However, I’ve come to learn over the past few years that not everything that soothes my soul must eventually settle around my waist. It’s actually true: although a part of me lives for sugar-laden delicacies, I do try to eat as healthfully as possible, making nutritious choices with all my snacks and meals, and giving myself a bit of leeway when it comes to dessert. But still, the bombardment of information on wholesome eating has brainwashed me slightly, so that cookies that are too overbearingly buttery or treats like fried Snickers bars no longer have the appeal they might have once had.
It was with a mind full of nutrition propaganda that I created this recipe for oatmeal raisin cookies. The thing about these cookies is that, while I perhaps would not start consuming them as a breakfast item, they are made with a surprisingly nutritious array of ingredients. Perhaps even more shocking, is that whenever I’ve had a rough day, these cookies take on all of the qualities of comfort food (especially when eaten directly from the oven): they are satisfying and chewy, and neither too sweet nor too bland.
One day, when I open that cookie catering business of mine, I believe these will be a top seller.
Today has been particularly harrowing, and I’d been working hard to get out of my mindset of self-pity and self-flagellation. As of my return to my apartment, I had tried every trick to improve my mood, and I still was nowhere near 100 percent. So, I went into my kitchen, opened my cabinets, and about 30 minutes later, I was substantially closer to utter bliss. Now, some of you may start to blame the carbohydrates and the sugar, and get all science-y with words like “serotonin” and “neurotransmitters.” That’s all very well and good, but I prefer to just believe in the magic restorative powers of my oatmeal raisin cookies.
P.S. Comfort food can render the complete opposite of its intended effect when consumed in mass, binging quantities. That’s why I love how easily these cookies freeze, to be saved for another day when your outlook is cloudy.
Here’s what you do: roll the dough into small 1-inch balls and place in rows, in a single layer on waxed paper. Then place the paper inside a gallon-sized freezer bag, or another freezer-safe container. When you’re again ready for the cookies, take them out of the freezer and bake right away (no need to defrost) for a couple of minutes longer than the given time.
Since I did freeze most of the cookies today, I don't have any pretty pictures of my own. But, a visual aid is essential, in my opinion, for baking, and so here are some yummy looking oatmeal raisin cookies (sans chocolate).
Chocolate Chip Oatmeal Raisin Cookies
Yield: About three dozen
Ingredients:
1 1/4 cups whole wheat flour
1/2 tsp. baking powder
1/2 tsp. baking soda
1 tsp. ground cinnamon
1/4 tsp. salt
1/3 cup granulated sugar
3/4 cup brown sugar
1 1/2 tsp. vanilla extract
1/4 cup + 2 tbsp. Lighter Bake* or unsweetened applesauce
2 egg whites
2 tbsp. skim milk
1 cup milk chocolate chips
1 cup uncooked quick oats
3/4 cup raisins
Directions:
Preheat oven to 375 degrees F. Combine flour, baking powder, baking soda, salt, and cinnamon in a small bowl.
Beat together Lighter Bake or applesauce, sugars, and vanilla. Beat in egg whites, one at a time. Add milk and beat well. Add flour mixture and beat. If the dough feels too dry and crumbly, add a small amount of milk. Stir in oats, raisins, and chocolate chips. Drop by rounded tablespoon on ungreased baking sheets. Bake 11-14 minutes.
*Lighter Bake is a brilliant butter/oil replacement made from pureed apples and plumes. It's available at most supermarkets and is all natural. And never fear, it does not generally leave a noticeable fruity track in your baked goods!
Monday, March 24, 2008
Flavors of Spring: Lemon and Blueberries
The real injustice, however, was that my mouth was (and still is!) too sore to enjoy the Cadbury eggs and Russell Stover marshmallow bunnies that everyone else, seemingly, was enjoying in vast quantities (I got that impression from a friend's "Happy Easter, too bad your mouth is too swollen for chocolate" email).
I therefore am attempting to forget about all the food I could be eating, and focus on the recipes I'll want to try once I'm up and about again. Although I'm eager to get back into my normal routine, it would be nice to spend a few more days at home, if only to have access to my mother's kitchen and all of its bounty (a dishwasher!? I'd forgotten what a miraculous invention this is). The sorbet I've been subsisting on is actually a very apt reminder of the spring sweets that will shortly be in season, and thanks to the smoothies I've been inhaling, I'm quite in the mood for a spring berry dessert. Luckily for me, I found this lemon berry pie recipe in my mother's files, and I remember it quite well as a refreshing and light dish perfect for April and May. The thing I like most about this pie is that you can use frozen berries, so if your fruit stand doesn't yet have a tempting selection, you can still enjoy this absurdly simple-to-make springtime dessert.
Lemon Whipped Pie
Ingredients:
1-1/4 cups graham cracker crumbs
1/4 cup (1/2 stick) butter, softened
1 pkg. (8 oz.) reduced-fat cream cheese, softened
1/4 cup sugar
1/4 cup milk
3 Tbsp. lemon juice
1 cup thawed Cool Whip Whipped Topping
3 cups blueberries
Directions:
Combine cracker crumbs and butter in 9-inch pie plate; press firmly
onto bottom and up side of pie plate.
Beat cream cheese, sugar, milk and juice in medium bowl with electric
mixer on medium speed until well blended. Gently stir in whipped
topping. Spread onto bottom of crust; top with blueberries.
Refrigerate at least 30 minutes before serving.
Thursday, March 20, 2008
On becoming a Domestic Goddess
Several years ago, when I was still in high school, I was in a bookstore with my then-boyfriend. We passed by a cookbook display, and out of the corner of my eye I saw a simple cover with an intriguing title: How to be a Domestic Goddess by Nigella Lawson. I quietly gasped and stopped, then picked the book up and began flipping through it, a smile growing on my face. After a few moments, my boyfriend gave me a dubious look and asked "Is that really what you want to be? A 'domestic goddess'?"About a year later, my mother and I were shopping for a wedding present when we passed by a Kitchenaid stand mixer. Again, I halted and took in the beauty of the lemon yellow appliance, imagining the sorts of elaborate cakes and exquisite pies that could come from it. I implored my mother to buy one for our kitchen, and she gave a short laugh. We left the store with a toaster oven.
Suffice to say, I've had a bit of a baking obsession for some time.
Although I love food, my passion does not generally stretch to the farthest culinary reaches, but can be satisfied quite simply, with a whisk and a mixing bowl in the kitchen. Perhaps this makes me painfully retro, but if that's the case, then so be it. I'm not ashamed that I secretly aspire to be Nigella, with her zest for life, her flair for cooking, and her perfectly whimsical cupcakes.
I always get a little excited when I pass by a Williams-Sonoma, but I unfortunately must admit that I'm not quite ready for that lofty level of baking. I don't make cheesecake enough to elicit the purchase of a springform pan, nor do I have the counter space to show off a lovely stand mixer (however, I'll gladly make the room if anyone is willing to donate one to my humble kitchen!)
Still, I like to think that I can prepare myself for these treasures by beginning my journey to goddess-ness now, with methods more within my means...even if that means using an old cookie sheet from Target.
I may never be a Domestic Goddess when it comes to gardening or re-upholstering chairs, or any other Martha Stewart-esque pursuit. But baking? I unabashedly say to the world (or, more accurately, the six people who read this blog) "I long to be a Baking Goddess."
Alright, those who believe that I just set womankind back 50 years by declaring my desire to spend some time in the kitchen, you may commence with the tomato-throwing. But after that, I highly suggest trying Nigella's super easy - yet entirely elegant - cupcakes.
Nigella's CupcakesYield: 1 dozen
1 stick plus 1 tablespoon soft butter
1/2 cup plus 1 tablespoon sugar
2 eggs
3/4 cup all-purpose flour
1/2 teaspoon baking soda
1 teaspoon baking powder
2 teaspoons vanilla extract
2 to 3 tablespoons milk
Royal Icing, recipe follows
-Take everything you need out of the fridge in time to get to room temperature - and this makes a huge difference to the lightness of the cupcakes later - and preheat the oven to 400 degrees F.
-Put all of the ingredients for the cupcakes except for the milk into a food processor and blitz until smooth. Pulse while adding the milk down the funnel, to make a smooth dropping consistency.
-Divide the mixture between into a muffin pan with paper liners, and bake in the oven for 15 to 20 minutes. They should have risen and be golden on top. Let them cool a little in their tins on a rack, and then take them carefully out of the tin to cool in their papers, still on the wire rack.
Ice with Royal Icing.
Royal Icing
2 large egg whites
3 cups confectioners' sugar
1 teaspoon lemon juice
-Combine the egg whites and confectioners' sugar in a medium-size mixing bowl and whip with an electric mixer on medium speed until opaque and shiny, about 5 minutes. Whisk in the lemon juice, this will thin out the icing. Beat for another couple of minutes until you reach the right spreading consistency for the cupcakes.
Photo courtesy of The Food Network
Wednesday, March 19, 2008
Chocolate Crinkles: This cookie will change your life
There are my grandmother's pierogis, my aunt's stuffed mushrooms, and my Cousin Mary's hot cider. The recipes for each of these dishes are floating around somewhere, but I made it a point very early on to obtain the recipes for a few particular Christmas cookies that always made it to the table. I have a recipe for macaroons and one for Rugelach, but the most prized cookie recipe I have is one that is also quite well known: Chocolate Crinkles (slightly adapted). Up until this year, I've only dusted this recipe off at Christmas time, dutifully making my share, then forgetting about them until the following winter. This year, however, I simply was not strong enough to part with these cookies, and so just this past weekend, I found myself mixing up another batch of batter. However, I'm convinced that there's nothing wrong with that. These chocolaty cookies are really just too chewy and too sweet to ignore, and they've already been the centerpiece for two post-holiday parties. Some people were all too familiar with the
cookie, and unabashedly ate seconds and thirds, and others were
sampling it for the first time, and were delighted with the results.
It's impossible for me to say for sure, but I do believe that this
might be one of my all-time favorite cookie recipes. Ever.
Chocolate Crinkle Cookies
Ingredients:
2 cups semisweet chocolate chips, divided
6 tablespoons butter, softened
1 cup sugar
2 egg whites
1 1/2 teaspoons vanilla extract
1 1/2 cups all-purpose flour
1 1/2 teaspoons baking powder
1/4 teaspoon salt
1/2 cup powdered sugar
Directions:
In a microwave, melt 1 cup chocolate chips. Stir until smooth; set aside. In a small mixing bowl, beat butter and sugar until crumbly, about 2 minutes. Add egg whites and vanilla; beat well. Stir in melted chocolate.
Combine the flour, baking powder and salt; gradually add to butter mixture. Stir in remaining chocolate chips. Cover and refrigerate for 1 hour or until easy to handle.
Shape dough into 1-inch balls. Roll in powdered sugar. Place 2 inches apart on ungreased baking sheets. Bake at 350 degrees F for 11-13 minutes or until set. Remove to wire racks to cool.