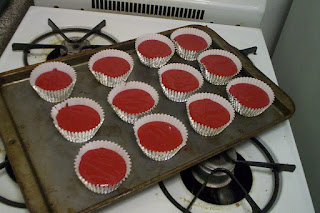
Brooklyn Flea and red velvet cupcakes: these are my two favorite things of the weekend.
The recipe below is from Magnolia’s More From Magnolia cookbook, and can also be found on a wonderful blog that I frequent, Nosh With Me at www.noshwithme.com
Red Velvet Cupcakes
Yield: About three dozen regular-sized cupcakes
Ingredients:
3 ⅓ cups cake flour (not self-rising)
¾ cup (1 ½ sticks) unsalted butter, softened
2 ¼ cups sugar
3 large eggs, at room temperature
6 tablespoons red food coloring
3 tablespoons unsweetened cocoa
1 ½ teaspoons vanilla extract
1 ½ teaspoons salt
1 ½ cups buttermilk
1 ½ teaspoons cider vinegar
1 ½ teaspoons baking soda
Directions:
Preheat oven to 350 degrees. Line a cupcake pan with paper liners, or grease and lightly flour.
To make the cake: In a small bowl, sift the cake flour and set aside. In a large bowl, on the medium speed of an electric mixer, cream the butter and sugar until very light and fluffy, about 5 minutes. Add the eggs, one at a time, beating well after each addition.
In a small bowl, whisk together the red food coloring, cocoa, and vanilla. Add to the batter and beat well.
In a measuring cup, stir the salt into the buttermilk. Add to the batter in three parts, alternating with the flour. With each addition, beat until the ingredients are incorporated, but do not overheat.
In a small bowl, stir together the cider vinegar and baking soda. Add to the batter and mix well. Using a rubber spatula, scrape down the batter in the bowl, making sure the ingredients are well blended and the batter is smooth.
Divide the batter among the prepared pans. Bake for 20 minutes, or until a toothpick inserted in the center of the cake comes out clean. Let the cupcakes cool in the pans for 1 hour. Remove from the pans and cool completely on a wire rack.
When the cake has cooled, ice with cream cheese frosting.
Frosting
1 pound (two 8-ounce packages) cream cheese, softened and cut into small pieces
6 tablespoons unsalted butter, softened and cut into small pieces
1 ½ teaspoons vanilla extract
5 cups sifted confectioners’ sugar
In a large bowl, on the medium speed of an electric mixer, beat the cream cheese and butter until smooth, about 3 minutes. Add the vanilla and beat well. Gradually add the sugar, 1 cup at a time, beating continuously until smooth and creamy. Cover and refrigerate icing for 2 to 3 hours, but no longer, to thicken before using.


No comments:
Post a Comment